Monday 28 December 2015

Carry on up the Northwest Passage - Part Two

Merry Christmas Readers! Ready to take a break from all that festive excess for a second dose of hardship and deprivation? Grab yourself a cold turkey sandwich and let us return to the search for the northwest passage. Part One here. If one thing other than the sheer impenetrable hostility of the icy north had hampered the search for a navigable passage from the Atlantic to the Pacific around the Arctic coast of Canada, it was the Hudson's Bay Company's complacent disinterest in exploration for its own sake. Profit was their sole motivation and it was not until the prospect of such arose that they stirred themselves to action.

As Arthur Dobbs had predicted when trying to dismantle the company's monopoly in the 1740's, only commercial pressures would prompt the Hudson's Bay Company to broaden their horizons. When they were eventually threatened by the emergence of Montreal based fur traders, who would later coalesce into bitter rivals the Northwest Company, the company attempted to diversify their interests. They began by sending out overland expeditions in the company of native guides in search of copper deposits, whose presence had been indicated by a Dene Indian leader named Matonabbee.

 
The mouth of the Coppermine River by George Back

In 1771 a former naval officer named Samuel Hearne, in company with Matonabbee, successfully descended the Coppermine River by canoe to reach the Arctic shore.
Hearne did not actually sight open sea but from the quantities of whale bone and seal skins he observed in the possession of the local Inuit it was clear that such existed. It was also clear from his journey that no navigable inland passage existed that could be accessed from the eastern or western coast. Hearne found no copper reserves worth the trouble and his journey is best known for his eye-witness account of the 'Massacre at Bloody Falls' of around twenty Inuit; men, women and children, by the Dene Indians accompanying him. The expedition set a template for future overland operations; following the rivers northward to the coast, living off the land and relying on the Indians' knowledge of the movements of game animals and hunting skills to keep the expedition supplied. Hearne had covered some five thousand miles and become the first European to reach the Arctic Ocean overland but in the view of the company there was little to be gained from any further expeditions.

The Northwest Passage

In 1775 the British government stepped in, offering a prize of twenty thousand pounds to any ship that could navigate the northwest passage. Of course, if there was such a thing as a northwest passage, then it had to be accessible from the Pacific as well as from the Atlantic. With this possibility in mind, the admiralty dispatched a two ship expedition to the Pacific in 1776. Naturally it was headed up by Britain's greatest exploring sailor; Captain James Cook aboard HMS Resolution, in company with HMS Discovery - always a popular name - under Lieutenant Charles Clerke. Once Clerke had extricated himself from a debtors' gaol, Discovery had joined Resolution in Cape Town and the expedition had proceeded through the Pacific at a leisurely pace; too leisurely in the view of some of Cook's officers. Having squandered the first Arctic exploration season tarrying in familiar waters, Cook finally departed newly discovered Hawaii in February 1778 and headed north. Having refitted on Vancouver Island, explored the Alaskan coast and penetrated the Bering Strait, Cook was finally stopped by a wall of ice at 70 degrees north on 18th August. The battered ships returned to Hawaii for the winter where Cook fell out with the natives with fatal consequences for himself. The nation mourned and interest in the existence of the passage was dampened.

James Cook on Vancouver Island

A decade later George Vancouver, who had sailed as a midshipman under Cook, commanded HMS Discovery on a four year expedition to the Pacific northwest commencing in 1791. The Spanish had also been showing interest in the territory and the voyage was something of a flag planting exercise. Vancouver nevertheless charted and probed methodically and diligently but found little to excite believers in the existence of the passage. War with France thereafter occupied the navy for the next twenty years with little thought for such peacetime niceties as exploration.

Once Napoleon had embarked on his own one-way expedition to far-flung St Helena, the navy suddenly found itself with large numbers of ships and even larger numbers of officers lingering on half pay in need of employment. For a plucky few, such employment and opportunity for advancement was presented by a rekindling of interest in Arctic exploration. The renewed search for the northwest passage was the pet project of the Second Secretary of the Admiralty Sir John Barrow.

Barrow was a man with a burning desire to fill in the blanks on the map and dispatched men of vigour to the Arctic and the Sahara in an attempt to ensure that it was Britain that led the way in discovery. In both theatres unimaginable hardships and privations would be suffered by those Barrow entrusted with his often poorly conceived missions. For the African adventurers death from tropical disease or hostile natives was close to inevitable whilst the polar explorers faced the prospect of years trapped in the ice and land journeys of hundreds of miles surviving on pitifully inadequate rations. Barrow presided over this heroic age of British exploration with an all pervasive influence; producing innumerable publications on geographical matters and chairing committees of learned enthusiasts whilst being obstinately blind to any argument that contradicted his own, often misguided, theories. He championed the achievements of his favourites, who reaped the rewards of their fame with promotions and knighthoods, whilst being monstrously ungrateful and vicious to those who he felt had failed to achieve their sometimes unachievable objectives. Many of those Barrow sent off into the unknown did not come back at all.

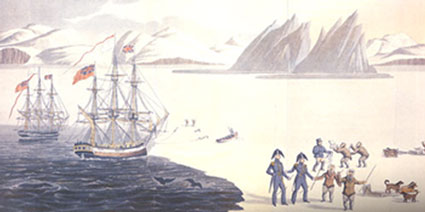
Ross and Parry meet the natives - painting by John Sackheuse
 
The initial impetus for a new Arctic expedition came from Cook's old shipmate and Barrow's friend and mentor Joseph Banks. Following correspondence with experienced Arctic whaler William Scoresby, whose sound advice Barrow would cheerfully ignore throughout  his tenure at the admiralty, Banks suggested that the passage should be attempted from the west once more. Scoresby had explained to Banks that a recent change in the ice conditions around Greenland, with open water to be found as far as 80 degrees north, presented a golden opportunity to penetrate into hitherto unexplored waters.

In the summer of 1818 Barrow's first Arctic expedition set out for the Davis Strait, under the overall command of Commander John Ross on HMS Isabella, ably supported by Lieutenant William Parry on HMS Alexander. Their volunteer crews were largely made up of experienced whalers. The two ships ventured up Davis Strait, leaving the whaling fleet behind them and making their way north into Baffin Bay, where no European had been since the man it was named after. Here the crews encountered Inuit who had been entirely cut off, even from their own kind. The ship's interpreter John Sackheuse, a Greenland native, was able to communicate with these 'Arctic Highlanders' as Ross termed them, and found that they believed themselves to be the only people on Earth. The natives were understandably nervous of the newcomers but curious and friendly enough, although to the dismay of the Anglo Saxons, they had no concept of property; helping themselves to any iron objects they could lay their hands on. The ships explored Smith and Jones Sounds and most controversially Lancaster Sound, all three of which were declared by Ross to be bays which terminated in high mountain ranges. This would turn out to be an optical illusion caused by atmospheric refraction. Parry on the Alexander, which had been lagging behind the Isabella, had seen no such thing. On the ships' return to England, Parry refused to support Ross' decision to turn back from Lancaster Sound without exploring further when it was questioned by a disappointed Barrow. The other young officers, including Ross' own nephew James, sided with Parry. Barrow would never forgive John Ross for his timidity.

Hecla and Griper entering winter harbour by William Parry

The following summer HMS Hecla under Parry and HMS Griper under Lieutenant Matthew Liddon, which was so slow that it had to be towed most of the time, set out once more for Davis Strait, Baffin Bay and Lancaster Sound. After following the Greenland coast to the latitude of Lancaster Sound, the ships were laboriously towed and warped through the ice floes of the central pack, with their crews straining on nine foot long ice saws and hauling on hawsers all day long for three weeks to cover the eighty miles to the far side of the pack. It may not have felt like a shortcut but it was and their efforts were rewarded in August when Hecla and Griper sailed through the open water of Lancaster Sound to cheers from their assembled officers and men. The expedition's progress was triumphant. The ships explored Lancaster Sound until ice barred their way between two large islands which Parry named Devon and Somerset Islands, though the bleak, boggy terrain of the islands bore little resemblance to those English counties. Turning south, they then explored a promising passage between the northwestern coast of Baffin Island and Somerset Island which Parry named Prince Regent Inlet, turning back after 120 miles and returning to Lancaster Sound which they were now able to penetrate further. Ice conditions were exceptionally favourable and Hecla and Griper sailed on, through a body of water Parry christened Barrow Strait to ultimately reach a furthest west of 112 degrees in mid September.

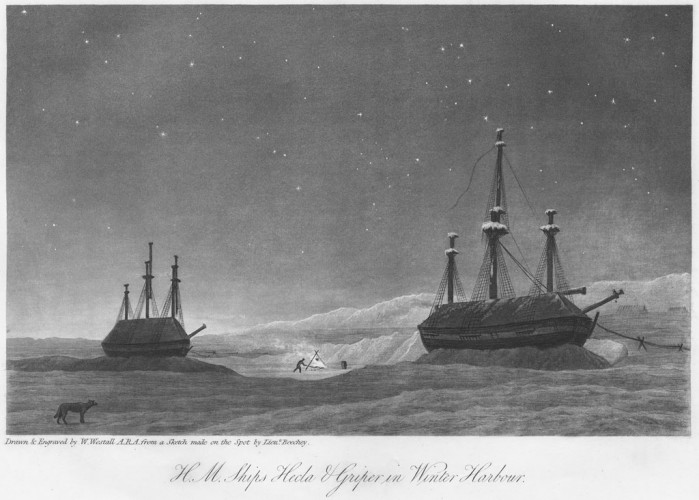
Hecla and Griper overwintering on Melville Island

With the onset of winter, Hecla and Griper settled in on the newly discovered Melville Island, named in honour of the First Sea Lord. Parry had prepared meticulously for this eventuality. The upper masts were removed and the ships were roofed over with timber and canvas. A network of pipes were installed to carry hot water from the galley stove all around the ships and keep the temperature at a reasonably comfortable level. Parry had brought plentiful stores including tinned meat, concentrated lemon juice and sauerkraut to ward off scurvy and in a particularly ingenious move he sowed mustard and cress seeds in trays arranged along the top of the hot pipes and soon they were covered with green shoots. The ptarmigan which populated the island were relentlessly hunted for fresh meat until the survivors migrated south. Along with scurvy, Parry viewed boredom as the greatest enemy and kept his men busy with daily chores. The decks were scrubbed and ice was scraped from the timbers. The officers were kept busy with scientific observations. Parry had also brought along a large barrel organ which played a reasonable range of tunes and provided both entertainment and music by which the men were encouraged to stomp around the deck when the weather was too grim to permit outdoor exercise. The organ can be seen today in the excellent Polar Museum in Cambridge and it is a thing of wonder. A weekly newspaper was produced and the officers put on theatrical productions with the midshipmen playing the female roles. Parry also ran a school so that all men of the crew who wished to learn to read and write could do so. Over the course of that dark winter, with temperatures reaching minus 75 Fahrenheit, Parry lost just one man to a lung complaint. It was a magnificent piece of leadership, providing the model for future expeditions and in Parry, the first great Arctic commander, one instantly recognises the qualities of Scott and Shackleton.

William Edward Parry

In the spring Parry began exploring the island by sledge and reached its northern coast. The summer however, brought no thaw. The ships remained frozen in their icy harbour and the prospect of a second winter in the Arctic threatened until on 31st July 1820 they were finally able to break out. Parry began once more pressing westwards but made it no further than the previous year when his ships were forced back by the encroaching ice. Parry gave up on 23rd August when it became clear that the only options were to retreat or endure another winter in the ice. They did not have the supplies for the latter and so Hecla and Griper sailed for home.

Parry's achievement was lauded by Barrow and he returned to a hero's welcome but privately he confided to Barrow that he thought the chances of making the passage so far to the north were slim to none. The focus therefore shifted once more to the north of Hudson's Bay. Parry set out again in 1821, this time commanding HMS Fury, sister ship to Hecla, which was commanded by the irrepressible George Lyon. Lyon had already had an eventful time going native in the Sahara in pursuit of Barrow's other Holy Grail - the Niger River. On this voyage Lyon would enjoy going native again, embracing the Inuit way of life; sleeping in an igloo, getting himself a traditional tattoo, sampling their food, learning their skills and bedding their women, whom he found to be most accommodating.

HMS Hecla by William Parry
 
Hecla and Fury, as converted bomb vessels were ideal for Arctic conditions. The ships were of robust construction to withstand the stresses of firing enormous mortars and were further reinforced for Arctic service. They also had a relatively shallow draft to allow them to approach shore defences,  which made them useful for probing bays and inlets. The two ships worked their way northwards along the western edge of Foxe Basin, taking turns to explore promising looking inlets so as to share the chance of making a momentous discovery and claiming glory. Hecla and Fury spent two winters in the Arctic, the second of which was spent within the strait that Parry named after the two ships, which passes between the extreme north-eastern tip of mainland North America and Baffin Island. Had it been passable, it would have led them through to the gulf at the bottom of Prince Regent Inlet, joining up the dots from Parry's previous expedition, but it remained impenetrably ice-clogged and the ships returned home.

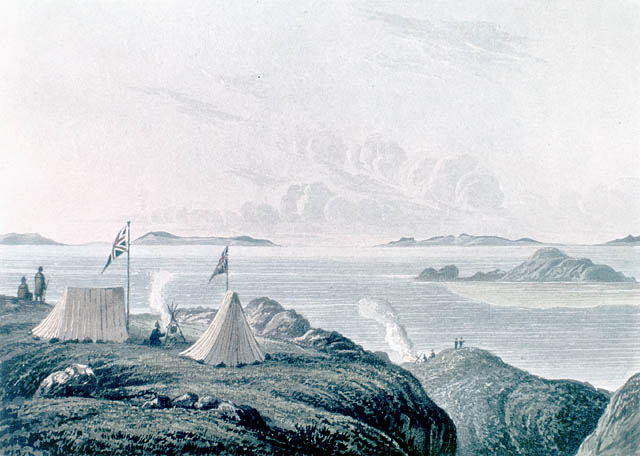
Making camp by George Back

The reception for Parry this time around was more muted, for the man of the hour was Lt. John Franklin, having led an expedition down the Coppermine River in emulation of Samuel Hearne with the reluctant and half-hearted assistance of the Hudson's Bay Company. Franklin's expedition, a mixture of naval officers, locally recruited trappers provided by the company known as voyageurs and Indian guides had reached the sea and proceeded eastwards along the coast for a distance of five hundred miles to a point south of Victoria Island which he named Point Turnagain. He had ventured too far and too late into the season however and the return journey overland was a nightmare of starvation with supplies exhausted and no game to be had, surviving on moss scraped from rocks. Abandoned by their Indian guides, over half of Franklin's party were lost. Six succumbed to starvation and three voyageurs and one British officer were killed by a voyageur driven to murder and cannibalism by the extremity of their situation. The killer was executed. Staggering back to their supply hut Fort Enterprise on the Coppermine, which should have been stocked with provisions, the desperate survivors found it empty and were reduced to eating the skin from their blankets and the leather from their boots. Just in time a party led by Midshipman George Back found the Indians charged with supplying them and help arrived. It had been a pretty disastrous enterprise but the sheer endurance of Franklin had seen him lionised rather than castigated.


HMS Griper in Roe's Welcome Sound 1824

On the face of it there was little cause for optimism but somehow Barrow was convinced that the prize was almost within their grasp and prepared to throw more men and resources at the northwest passage than ever before. One last push was what was required and the glory would be Britain's.
Parry and Lyon were sent northwestwards again, although this time separately. Parry took Hecla and Fury under Lt Henry Hoppner once more to Prince Regent Inlet but the winter of 1824 proved to be exceptionally hard and the ice conditions were the worst Parry had ever encountered. Fury was wrecked in the ice and its supplies had to be abandoned on Somerset Island, providing a useful cache for future expeditions. The two crews returned home disconsolately aboard Hecla.

Lyon also endured a terrible voyage in the wretchedly slow and poorly handling HMS Griper which never should have been sent back to the Arctic. Lyon's mission had been to sail to Repulse Bay at the head of Roes Welcome Sound; a narrow passage which led from Hudson's Bay to Foxe Basin, and then head overland, investigating the northeastern coast as he went and hopefully encountering Parry as Hecla and Fury advanced southwards down Prince Regent Inlet, before ultimately reaching Franklin's Point Turnagain. Griper had to be towed across the Atlantic by its own supply ship and received such a terrible battering in reaching Repulse Bay that the expedition was abandoned and the Griper limped back again a virtual wreck, with all its anchors lost. Lyon fell out of favour with Barrow and his career was over.

Beechey's 1825 portrait of John Adams, the last Bounty mutineer

After all his sufferings Franklin was nevertheless prepared to undertake another expedition, this time  following the course of the Mackenzie River further to the west. This expedition was meticulously planned by Franklin, incredibly well supplied and equipped and the personnel were almost entirely British, with reliable tars replacing the flakey voyageurs. There would be no repeat of the horrors of his first trip and this would be a hugely successful enterprise which would map almost two thousand miles of the coastline of northern Canada and spend two winters in perfect comfort in warm, well stocked cabins. Meanwhile Capt. Frederick Beechey in HMS Blossom once more attacked the passage from the Pacific side; penetrating further eastwards than ever before using small boats to probe where the Blossom could not. At their closest point, Beechey and Franklin's parties had been just 160 miles apart. On his return voyage Beechey put in at Pitcairn Island where he discovered John Adams; the last surviving mutineer from the Bounty, along with the descendants of the other mutineers.

By 1827 all expeditions had returned and Barrow took stock. There had been successes and failures but rather than following up on any of them in particular he decided to send Parry and James Ross to Spitsbergen in HMS Hecla from where they made an ill-considered  attempt to reach the North Pole using wheeled boats pulled by reindeer. How splendid it would have been had it succeeded but it was sadly a dismal failure. Thereafter Barrow found his budget drastically cut as a result of political upheaval and could only survey his charts with their diminishing blank spaces and wait for better days to come around. For now the northwest passage was keeping its remaining secrets.

Continue to Part Three


Thursday 22 October 2015

Of War and Wisdom


This post follows on from the previous Abbasid post Brothers up in Arms. It was originally written as one post but I felt it was a bit long so cut it in half and will conclude the life of the caliph Mamun here.


At the end of the last post we left the caliph Mamun back in control in Baghdad and engaged in reconciliation and rebuilding following the civil war with his brother and his failed attempt to rule the caliphate from distant Merv. In 821 an opportunity presented itself for Mamun to interfere in affairs in Byzantium with the appearance in northern Syria  of Thomas the Slav, who was leading a rebellion against the incumbent emperor Michael II. Thomas' emissary to the caliph was sent with extravagant promises to make. Allowing for propaganda intended to blacken his name as a traitor to the empire, Thomas is variously credited with signing away frontier provinces or perhaps even undertaking to en-fief the entire empire to the caliphate in exchange for an alliance which would safeguard his rear whilst he turned his forces against Constantinople. The caliph accepted with alacrity and provided Thomas with a substantial contribution to his war chest. The rebel was even permitted to celebrate his coronation as Emperor of the Romans in the city of Antioch. Mamun would have been advised to remain sceptical of the bargain. Thomas, after all, was not the first Byzantine rebel commander to promise much and deliver nothing.


Thomas the Slav arrives in Syria - Madrid Skylitzes
 
 
At any rate Thomas’ friendly overtures were well timed for the caliph had his hands full already with continuing unrest in Syria and Egypt and a rebellion by the Khurramite sect, centred on present day Azerbaijan, which had sprung up during the civil war. The Khurramites followed a belief system which fused ideas from the Zoroastrian cult of Mazdakism with Shia Islam and like earlier movements they revered the memory of Abu Muslim. The leader of the revolt was Babak, who claimed descent from Abu Muslim and also claimed rather interestingly to have inherited the soul of the previous Khurramite leader, which had fused with his own. In true guerilla style Babak had taken to the mountains and a succession of governors of Azerbaijan had failed to deal with him. By using the terrain to his advantage he had been able to win many victories over the Abbasid forces sent against him, falling upon and slaughtering his enemies in bad country and then melting away once more. His successes had brought more support for the revolt and pockets of Khurramite resistance were springing up all over the Persian territories of the Caliphate. More trouble on the north-western frontier therefore, was the last thing the caliph wanted. In the event however, Thomas' rebellion ended in failure, defeat and crucifixion. See here for more on this episode.
 

By 826 Mamun had regained a firm grip on his territories with Syria and Egypt having been entirely pacified by the son of Tahir and returned to obedience. The rebellion of the Khurramites was still ongoing but the tide seemed to be turning. In 830 an army of Khurramite rebels holding out in the Zagros Mountains of western Iran led by a Persian nobleman by the name of Nasr was heavily defeated by the Caliph’s forces. Seeing the writing on the wall for the Khurramite cause, Nasr chose to lead his surviving troops through Armenia out of harm’s way and sought refuge within the Byzantine Empire.


The arrival of Nasr with some fourteen thousand armed followers who professed themselves willing to fight for the empire against the caliphate was greeted rapturously by the new emperor Theophilus, who had succeeded his father Michael II in 829. The new arrivals were given land and incorporated into the Byzantine military under the command of Nasr himself, upon whom the emperor bestowed Patrician rank. Nasr and his followers agreed in principle at least to embrace Christianity and were baptised. Nasr now took a new Christian name and became Theophobos. As Christians, the former Khurramites were now permitted to marry and Theophobos was given the emperor’s own sister-in-law as a bride. The fugitive rebel had landed on his feet.
 

Embassy from Theophilus to Mamun - Madrid Sylitzes
 

Good relations had previously been established between Theophilus and Mamun but this provocation was too much for the caliph, who decided that the time had come to lead an expedition against the infidel as his father had done. In the summer of 830 he launched a limited invasion of Anatolia, with his son Abbas also leading a column. Little was achieved aside from symbolism but in the following year Theophilus retaliated against the raid by invading Muslim held Cilicia and sacking Tarsus. Elated by his success, Theophilus returned to Constantinople and celebrated with an elaborate triumphal procession followed by races in the hippodrome in which he himself participated. Mamun meanwhile had retired to Damascus. The first Abbasid caliph to visit the city, he was making a point of showing his face in recently re-pacified Syria. Retaliating in turn to Theophilus’ campaign, Mamun once more led his forces across the border and captured the town of Heraclea, which his father had also successfully taken in a much celebrated victory.


 In 832 a tenuous peace was negotiated between the two empires whilst Mamun, who must have been the most well travelled of all the caliphs, decided to visit Egypt and show his face there too. Whilst in the land of the pharaohs, the ever curious caliph decided to investigate the pyramids and had an exploratory tunnel dug into the side of the Great Pyramid. This tunnel intersected the interior passages within the pyramid and the caliph was able to venture inside and make his way up to the burial chamber of Khufu, only to find the sarcophagus empty and the tomb looted in distant antiquity.


 With his Egyptian efforts frustrated, the caliph set out once again in the summer of 833 in what promised to be a more sizable campaign against the Byzantines. As he relaxed beside a stream during his advance from Tarsus however, the caliph suddenly took ill and his fever soon proved fatal. He had named no successor, realising perhaps the futility of such actions. His younger brother Qasim, who had been appointed third in line in the provisions of their father Harun al Rashid, moved swiftly to seize the reins of power as caliph Al-Mutasim. Mamun was laid to rest in Tarsus and his tomb survives to this day.


In overall assessment Mamun, for me at least, emerges as a more impressive figure than his more famous father Harun al Rashid. He had shown himself a good judge of character in the men he had chosen to trust and had displayed a willingness to accommodate, reconcile and compromise in his policies and his exercise of mercy where possible. He was nevertheless prepared to be utterly ruthless when a change of policy demanded it. He was, above all, a pragmatist.


Muslim scholars discuss the use of the astrolabe

 
Mamun’s greatest legacy is as a patron of scientific enquiry. Whereas  almost every anecdote about Harun seems to involve dancing girls and drunken poets, Mamun appears to have taken a serious interest in the scholarship being pursued in Baghdad under the auspices of the caliphs. The institution that would come to be known as the Bayt al-hikma or House of Wisdom was first established in Baghdad under the auspices of Mansur as a safe repository for his growing collection of scientific and philosophical manuscripts. This is imagined as a centrally organised and officially controlled research facility but in truth no such control or organisation existed and individual scholars carried out their work independently with funding from wealthy patrons amongst the caliphs' nadim. The term House of Wisdom is better thought of as an idea or a movement at this point in history rather than a place. The effort to translate works from Greek, Indian and Persian into Arabic had been given particular impetus by the Barmakids. Yahya the Barmakid is said to have commissioned the first Arabic translation of Euclid and he and his sons numbered many pet scholars amongst their clients.


Mamun of course was raised as the protégé of Jaffar the Barmakid and perhaps gained his eager curiosity and love of scientific enquiry from the scholars patronised by Jaffar. Under Mamun’s caliphate the pursuit of scientific knowledge received a massive boost from the personal interest that the caliph took in such matters. Mamun made enquiries as to his scholars’ needs and progress, sourced new manuscripts and scientific instruments during his visits to Damascus and Egypt and oversaw the construction of a new observatory in Baghdad. Stepping into the shoes of the Barmakids came three brothers known as the Banu Musa who had accompanied Mamun westwards on his return from Khurasan. Like the Barmakids they were an old Persian family, wealthy, cultured and well connected. Working for the Banu Musa, a good translator could earn five hundred dinars a month and they assembled an army of them.


Foremost of all the scholars of Baghdad during Mamun’s reign was Muhammad ibn Musa Al-Khwarizmi. This great polymath was another who had made his way westwards from Khurasan to the City of Peace. His contribution to modern mathematics, astronomy and geography is formidable. Even the Western corruption of his name is preserved in the term algorithm. Al-Khwarizmi was responsible for the production of three great works of translation and further scholarship, whose transmission to the west have cemented his reputation as the greatest of oriental sages. The first was a distillation of all Indian mathematical and astronomical knowledge which had been transmitted to the Arab world within a corpus of work called the siddhanta. To this Al-Khwarizmi added star tables known as the zij al sindhind whose accuracy would be unsurpassed for centuries and the earliest known description of the use of the astrolabe. Al Khwarizmi also needed to include an explanatory treatise on the Indian system of calculation using the numbers 1-9 along with the concept of zero.


Muhammad ibn Musa Al-Khwarizmi


If like me you hated maths at school then you have reason to curse Al-Khwarizmi for his next work; the book of restoring and balancing, Kitab al jabr wa’l-muqabala, from which we take the term algebra. The book detailed the use of equations in solving the problems of the day; calculating tax or inheritance, partitioning land and regulating trade. His third great work the al-majisti was a translation and commentary on the works of Ptolemy, known as the Almagest in the West.


Upon perusing the Almagest, Mamun demanded a practical demonstration of the theory within. In a study commissioned by the caliph to determine the accuracy of Ptolemy’s estimate of the circumference of the Earth, a party of astronomers set out into a flat area of desert and measured the altitude of the pole star. Driving a pole into the ground they fixed a piece of cord of known length to it and then walked north in a straight line, taking measurements of the altitude of the pole star as they went, driving in more posts and running out the cord behind them. Once they had reached a point at which the altitude of the pole star had risen by one degree, they retraced their steps along the posts they had driven into the ground and measured their distance travelled from the length of cord they had paid out. I can only assume that someone was following on behind on the way out to recycle the cord already used, unless they were carrying 66 miles of cord with them, for that was the measured distance travelled; 66.6 miles to be precise. Proceeding south from their original start point they then continued until they had covered the same distance at which point they observed that the altitude of the pole star was one degree lower than at their start point. The entire experiment was then repeated in a second area of desert and the measurements found to be the same, at which point the caliph declared himself satisfied with their observations. The distance corresponding to a degree of latitude was found to be 32.2 farsakhs or 66.6 miles. From this it was concluded that the circumference of the Earth was eight thousand farsakhs, or 24,000 miles, impressively close to the modern figure.


Such was the standard of intellectual enquiry taking place on Mamun’s watch. It would be three centuries before anyone in the West even started to catch up. None of his successors would match his passion but the touch paper had been well and truly lit and would continue to burn brightly.

 Mamun and the pyramids


Monday 12 October 2015

Brothers up in arms


This post follows on from Harun al Rashid Part Two - Fall of the Barmakids


If Al Amin the son of the Commander of the Faithful should attempt to remove Al Mamun the son of the Commander of the Faithful from his right of succession after himself or if he should attempt to remove Al Mamun from the governorship of Khurasan, or if he should attempt to dismiss any of his military commanders whom the commander of the faithful attached to al Mamun’s side, or if he should attempt to deprive him of either a small or a great part of what the Commander of the Faithful has granted to him, in any manner whatsoever or by any stratagem whatsoever, be it insignificant or momentous, then the Caliphate shall pass directly to Al Mamun and he shall come before Al Amin and be the one invested with power after the Commander of the Faithful.

 
The Caliph Al Mamun as depicted in the Madrid Skylitzes


Harun al Rashid could not have made it clearer. His dispensations regarding the succession were inviolable. If  his heir Al Amin interfered in any way with the rights of his brother either in regard to the succession or to the governance and control of the eastern provinces then his right to the caliphate was forfeit. All military commanders and indeed all Muslims in general would be released from their oaths of loyalty to Al Amin and would be expected to support the claim of Al Mamun. His sons had both written out declarations, swearing to uphold their obligations to each other and to the their younger brother Qasim, who was third in line. These were displayed on the walls of the Kabaa in Mecca. The caliph had written to every governor in the caliphate with a proclamation to be read out to all the people so that they understood what had been agreed and solemnly sworn to in Islam’s most sacred space. The oaths were awesome, binding and permanent. Those who broke even the smallest part of them would suffer the righteous anger of the Almighty himself. They were unfortunately, also not worth the paper they were written on. Incidentally, the oaths probably were written out on paper as the knowledge of paper production had by this time made its way from China to the Arab world, brought westwards from Khurasan with the Abbasids.


Harun, who died in March 809, was not long in his grave before the two brothers began moving inexorably towards conflict. Responsibility for the war must be laid at the door of Al Amin, the ruling caliph, who soon demanded the handing over of territory and revenues from his brother in direct contravention of the terms of the succession. As was his right, Mamun refused his brother’s demands. From their respective courts in Baghdad and Merv the increasingly strained diplomatic correspondence flew back and  forth by the efficient state postal service known as the Barid, whose riders could carry messages along the Khurasan highway at a rate of 400km a day. If there is a true villain of the piece it is Fadl ibn Rabi, likely architect of the downfall of the Barmakids, who had found himself in Baghdad as Amin’s chamberlain. With a eye to his own and his family’s fortunes, Fadl had no stake in a future with Mamun as the next caliph. From the first he worked to remove Mamun from the succession and encouraged Amin to this end. Having successfully provoked disagreement between the brothers, Fadl continued to raise the stakes until war was inevitable.


Mamun meanwhile, taking advice from the hawks in his own court, decided to test the extent of his brother’s hostility. He wrote to request that his sons and their mother be sent to him in Khurasan along with a large sum of his own money. Both were refused and the worst fears of Mamun and his supporters were confirmed further when news arrived that his brother had excluded his name from the Friday prayers in Baghdad. Towards the end of 810 Amin took the final fateful steps. The proclamations were torn down from the sacred walls of the Kabaa and brought to Baghdad, where the caliph publically ripped them up, before declaring that his own son Musa would succeed him as caliph.

 Modern Tehran in the shadow of the Elburz Mountains - picture by Hansueli Karpf

Soon moves were afoot to depose Mamun from the governorship of Khurasan by force and a large army of some fifty thousand men was assembled. The commander of this force was none other than the formally disgraced governor of Khurasan, Ali ibn Isa, whose misconduct had prompted Harun al Rashid to take his last fatal journey east. Ali was a key member of Amin’s inner circle but his appointment was a double edged sword. In Khurasan he was a hated figure from his years of corrupt administration and the prospect of his return at the head of a conquering army encouraged the people of the region to throw their support firmly behind Mamun against his brother the caliph.


On paper, of which as mentioned there were plentiful supplies, Mamun did not have much of a chance. A small force of just five thousand men was all that could be mustered for the defence of the east and was dispatched to the city of Rayy which stood in the path of Ali’s advance. Rayy, situated close to modern Tehran, presented a formidable bastion guarding the only route to Khurasan between the Elburz mountains and the Iranian desert. In command of the defenders was one Tahir ibn Husayn, a young aristocrat from the Afghan city of Herat. Mistrusting the citizens of Rayy to remain loyal if he garrisoned the city and allowed himself to be besieged, Tahir instead elected to face Ali in the field. If the numbers given for the respective forces are correct then Tahir faced odds of ten to one. On a sandy plain a day’s march from Rayy, which offered no advantages of terrain to the defending force, the two armies met. Tahir must have either had a yearning to enter paradise or supreme confidence in the quality of his small force but if it was the latter then his faith was not misplaced. An initial cavalry assault by Ali’s army was seen off by the defenders before they made an attempt to negotiate by citing the late Harun al Rashid’s now defunct proclamations. Ali’s response was to put a price on the negotiator’s head. Battle was rejoined and in the furious fight that ensued, the hated Ali was a marked man. He was cut down and beheaded and with the death of their commander his army’s morale and discipline collapsed despite their superior numbers and they were routed.

 
The city of Hamadan saw Tahir's second victory


Most commanders would have remained on the defensive following such a fortunate victory but once he had dispatched the news of his victory to Merv, Tahir immediately once again showed his exceptional boldness and initiative by marching westwards along the Khurasan highway with his small force. The army of Ali had broken up in disarray and offered no further resistance and a new force had been hastily assembled and sent out from Baghdad when news of the defeat had arrived. Tahir was able to defeat this force outside Hamadan and marched on to seize the town of Hulwan, which lay on the far side of the Paytak pass through the Zagros mountains. Having cleared the mountains, Tahir was now just a hundred miles from Baghdad and now he waited. The odds were still stacked against him but following the two shock defeats, things were falling apart for Amin. Having lost both the moral high-ground and the strategic initiative the caliph’s stock was falling and only large payments and promises of rewards in Khurasan when the war was won served to keep the army of Baghdad (Abna) and the tribal chiefs of Iraq onside. Tahir was showing himself to be a strategist of genius, dispatching agents to sow dissension amongst his enemies and circulating derogatory rumours of a homosexual relationship between Amin and Fadl on the streets of Baghdad. A new force of some forty thousand made up of the soldiers of the Abna and Arab tribesmen was dispatched towards Hulwan but such were the divisions and jealousies between the two groups, encouraged by Tahir's agents who had infiltrated their ranks, that they fell to fighting each other before they were able to bring Tahir to battle.


Just as Caesar had crossed the Rubicon and swept down upon a panic stricken Rome with just a single legion and plenty of audacity, so Tahir now capitalised on the chaos and marched at the head of his tiny army into Iraq. His position in Hulwan was taken over by Harthama; Harun al Rashid’s most trusted general who had pledged his loyalty to Mamun. Harthama had arrived from Khurasan with reinforcements, allowing Tahir to go back on the offensive. Avoiding Baghdad for the time being, Tahir marched into the south and met with minimal resistance. Basra surrendered without a fight. In the holy cities of Mecca and Medina where there had been shock and dismay at Amin’s disregard for the sacred oaths that had been sworn, the people declared their allegiance to Mamun, as the wronged party, keeping to the letter of Harun al Rashid’s instructions.

 
Medieval depiction of Mecca


In the summer of 812 Tahir and Harthama laid siege to Baghdad, where Amin remained holed up, now deserted by the majority of his troops and dependent upon the ordinary citizens for the defence of his capital. Despite having only rudimentary weapons and makeshift armour, the civilian militia raised from the poorest inhabitants, known as the ‘naked ones’ due to their lack of proper military equipment, put up a fierce resistance and the siege dragged on for a whole year whilst conditions in the city became increasingly worse. Vicious fighting ensued as the war for control of the city was fought street by street. Siege artillery was brought up and whole districts of the city of peace were battered into rubble. Law and order broke down as supplies ran low in the city and criminal gangs roamed the shattered streets. Many innocents were caught in the cross fire of arrows, stones and flaming missiles that rained down upon the stubborn defenders. The middle classes meanwhile tried to keep their heads down and protect their property as best they could.


Finally the attackers fought their way to the Eternity Palace where Amin was hiding, deserted by all but a few loyal supporters. Even Fadl ibn Rabi had abandoned his caliph and gone into hiding. As the palace crumbled and burned from the bombardment of Tahir’s siege artillery, Amin fled first to the old round city and then took to the river in a desperate attempt to avoid capture or at the very least surrender to Harthama, who he believed would spare his life. His escape failed when the boat sank in the Tigris and the bedraggled caliph was taken prisoner by Tahir’s men as he made his way to the bank. Locked in a store room in a nearby house, Amin was attacked by a mob of soldiers on Tahir’s orders later that same night. Wrestled to the floor, his throat was cut and his head was then struck off and taken to Tahir. His body was unceremoniously dumped. The caliphate belonged to Mamun, but its capital was in ruins and untold misery had been brought upon its people.


For the next six years, Mamun attempted to run the caliphate from his base in Merv. In 816, in what may have been a cynical gesture to garner a new base of support in Iraq or a genuine attempt to heal the breach in the Muslim community, Mamun declared that his successor as caliph would be not his younger brother Qasim nor any member of his family but the Alid imam Ali al-Ridha. Directly descended from the Prophet in the eighth generation, Ali’s pedigree was unquestionable. He was also the focus of pro-Alid rebellion. A revolt against Abbasid rule led by al-Ridha’s brother had broken out in Kufa, that perennial nest of troublemakers, in the previous year and been put down only with difficulty by the ever-loyal Harthama. Appeasement of the Alids made political sense therefore and Ali had joined the caliph in Merv and  had even publically chastised his brother for the blood that had been shed on his account. In the erstwhile corridors of power in Baghdad however, there was deep consternation at the thought of the Abbasid dynasty being replaced by an Alid one and all of the privileges of the incumbent ruling elite being stripped away. Mamun’s absentee rule had caused disquiet but this latest move provoked outright rebellion and Ibrahim, the hedonistic poet brother of Harun al Rashid was thrust somewhat unwillingly into power in Baghdad as a rival caliph.

 
Shrine of Ali al Ridha - Tus Iran


Enough was enough and Mamun now moved decisively and ruthlessly to regain control. It was time to move to Baghdad with his entire entourage. In his policies he had been guided from the beginning by his vizier Fadl ibn Sahl. Ibn Sahl accompanied the caliph as he finally made his way westwards to Baghdad but along the way he was murdered in his bath. When he reached Tus, Mamun paused to visit the grave of his father Harun al Rashid. Whilst here, perhaps with thoughts turning towards matters of succession, he also rid himself of Ali al Ridha, abandoning his policy of appeasement of the Alids. Almost certainly poisoned on Mamun’s orders, Ali was buried in the same garden beside Harun al Rashid  Today a magnificent shrine complex marks the burial place of this Shia martyr, whilst the grave of the famous caliph is entirely forgotten.


Mamun finally reached Baghdad in 819 and was rapturously received by the populace. Tahir rode at his side and would be richly rewarded with a palace in Baghdad and the governorship of Khurasan which he and his descendants would rule over as a virtual fiefdom for the next half century. It was no less than this brilliant general deserved. His son was raised to high command and given charge of bringing Syria and Egypt, which had descended into rebellious chaos, back into the fold.


 In ditching his pro-Alid policy, coming west and taking his proper place in his capital the caliph was quickly able to silence the dissenters. He had adopted green as his official colour in accordance with his new Alid alliance but dropped this within days of his return to the capital in the face of widespread disapproval and resumed the traditional Abbasid black. Reconciliation was the order of the day and even Fadl ibn Rabi, the principle architect of the civil war, was forgiven and reinstated. Zubayda, mother of the murdered Amin, was reconciled with the caliph and was treated with honour for her remaining years. Fearing the worst, Mamun’s uncle Ibrahim had gone into hiding when his supporters had cast him aside and pledged their loyalty to the approaching Mamun. He was arrested in Baghdad whilst trying to escape disguised as a woman and brought before Mamun. In a scene remembered in the Arabian nights, the poet did his best to excuse himself in florid verse and Mamun spared him, accepting that Ibrahim had in truth had no desire to usurp him, although he was kept under house arrest.


With all set to rights, Mamun set about the process of rebuilding his city and he would see it become the cultural and intellectual powerhouse of the age. In the remainder of his reign Baghdad would reach its apogee. In a grand gesture symbolising the return of the good times Mamun married Buran, the niece of his murdered Vizier Fadl ibn Sahl, in the most expensive wedding perhaps of all time. The celebrations were truly magnificent and the occasion is said to have cost 50 million dirhams with members of the ruling family spending millions more on additional ostentation. Zubayda, taking centre stage as the grand dowager of the dynasty, spent 35 million and poured a thousand pearls over the bride by way of expensive confetti. The wedding favours were balls of musk, each of which contained a slip of paper with the details of a magnificent gift written thereon, with the star prizes including estates and palaces. If Carlsberg did weddings, they would be just like this one. It was a particularly good day for Mamun's Uncle Ibrahim who won his freedom at the bride's request and was restored to a place of honour. For the ruling elite happy days were here again, but for how long would they last?

Part Two Here

The shrine of Ali al-Ridha
http://www.al-islam.org/history-shrines/history-shrine-imam-ali-b-musa-al-ridha-peace-be-upon-him-history-mashad


Wednesday 16 September 2015

Here Come the Men in Black

Ka mate, ka mate! ka ora! ka ora!
Ka mate! ka mate! ka ora! ka ora!
Tēnei te tangata pūhuruhuru
Nāna nei i tiki mai whakawhiti te rā
Ā, upane! ka upane!
Ā, upane, ka upane, whiti te ra!
 
 
New Zealand 1820. The conflict known to posterity as the Musket Wars is in its early stages. This was an escalating cycle of increasingly bloody tribal warfare, fuelled by the arrival of Europeans who had revolutionised the traditional practice of raiding parties or taua through the introduction of both firearms and the humble potato. Better armed and better fed through these two innovations, obtained from European settlers, who had short-sightedly traded guns in exchange for land, the Maori had been able to launch ever more ambitious raids upon their neighbours.

A musket wielding Maori war party
 
It was whilst fleeing from one such bloody encounter on the North Island that the leader of a war party of the Ngati Toa tribe named Te Rauparaha sought to evade his pursuers by hiding in a food storage pit. He waited in the darkness and then at last the covering of the pit was pulled away. Blinking in the sunlight, Te Rauparaha did not know if it was a friend or an enemy who had discovered his hiding place. Were these his last moments or was he saved? It turned out that it was his ally who had found him, Te Whareangi; the hairy man. After clambering up gratefully into the sunlight to be greeted by his friend, Te Rauparaha decided to immortalise his deliverance in the words of a haka or ceremonial war dance, which are at the top of this post. It translates as:
 
It is death, it is death, it is life, it is life,
It is the hairy man,
Who brought the sun and caused it to shine,
A step upwards, another step upwards,
A step upwards, another step upwards, the sun shines.
Rise!

 
Fast forward to 1888 and the natives had developed a taste for rugby as well as guns and potatoes. There had been touring parties of rugby players to Australia endorsed by some or all of the New Zealand unions since 1883 but this latest undertaking was more ambitious in scope. After an eleven match warm up in New Zealand and Australia the 26 man squad, known as the 'Natives', comprising 21 players of Maori descent and 5 New Zealand born players of European descent, set out for Britain. On the way they played the first recorded match on Egyptian soil during a stop-over in Suez. The Natives seem to have been as much of a curiosity for the British spectators as a sporting spectacle.  Before each match the Maori were to perform a haka in their native dress for the entertainment of the crowd. The dressing up element was soon abandoned and the players instead performed the haka in their kit before getting stuck into the opposition. A tradition had been born. The Ka Mate haka is believed to have first been performed by an All Black side in 1906 and has been the favourite ever since with occasional variants.
 
1888 Natives XV in Queensland
 
The Natives' tour was a great success. They won 49 out of 74 games played on British soil including a victory over an Ireland national side, although they lost their matches against England and Wales and were also defeated by both Oxford and Cambridge Universities. There was controversy in the match against England when the English player Andrew Stoddart lost his shorts. In the interests of decency the New Zealand players stopped playing whilst Stoddart recovered his attire, but an enterprising England player picked up the ball and ran in for a try. Three of the New Zealand players left the pitch in protest yet the referee, George Rowland Hill, who also happened to be the secretary of the RFU, so was not exactly impartial, both allowed the try and allowed play to continue whilst the three players were being persuaded to return. After leaving British shores, the Natives went on to win another 25 out of 32 matches played in Australia upon their return.
 
The Natives were not considered a true national team and so the first match considered to be a full international featuring a team representing New Zealand was played in 1903. The New Zealand team defeated the Australian national side 22-3 at Sydney cricket ground. Before the match the New Zealand team performed a haka with the words Tupoto koe, Kangaroo - Watch out Kangaroo! In the following year they inflicted a defeat on the Great Britain touring side in Wellington. See here for post on early Lions tours.
 
Punch cartoon 1905 - the unlicked cub
 
1905 saw the first true international New Zealand touring side set out for a grand tour of Europe and North America. Known simply as 'The Originals' their exploits have become the stuff of legend. It was this team who were the first to play in all black strip and so were quickly dubbed the 'All Blacks' by the British press. Arriving in Plymouth in September 1905 the New Zealanders first faced the Devon county side whom they swept aside in a 12 try demolition to win 55-4. Some of the stunned newspapers reported the score-line the wrong way around. The New Zealanders followed up with an 11 try 41-0 drubbing of Cornwall and then continued in the same vein as they toured the country, dishing out humiliation wherever they went. By the time they reached Scotland for their first international in mid November they had won 19 straight matches. 15 of these had been won without conceding a point. In Edinburgh they received a snooty reception from the gentlemen of the Scottish RFU who refused to socialise with the colonials. Un-phased, the All Blacks beat the Scots 12-7.
 
The superior professionalism of the New Zealanders; a dirty word amongst many in the British establishment, was the key to their success. They trained hard and they practiced their set piece drills. Unlike the British opposition, who simply piled in to the scrum in the order they arrived, each forward had a set position in the scrum. They scrummaged differently to the British teams who adopted the 8 man formation we are familiar with today. The All Blacks played with just 7 men in the scrum and only 2 players in the front row. This mismatch actually worked to the New Zealanders' advantage since by applying pressure to only one side of the scrum they were generally able to drive their opponents off the ball and this was an area in which they dominated. As well as being more organised, the All Blacks played with more attacking verve. The sight of the New Zealand full back actually counter-attacking rather than playing an entirely defensive role was considered highly novel. There was also much grumbling that the All Blacks played a little too rough, although there was less complaint amongst the workmanlike northern clubs than amongst the more genteel southern clubs.

All Blacks vs England 1905 - note the NZ scrummaging

The All Black steamroller continued. Ireland and England were both beaten 15-0. It was down to Wales to salvage some British pride. The Welsh had been doing their homework on the New Zealanders' unique scrummage and had come up with an innovation of their own. When the two sides met in Cardiff the Welsh also formed up with a seven man scrum but with four men in the front row. Only three would engage however and the spare man would then run around the back of the scrum and join in the second row on the loose head side, (explained better in the link at the bottom). The All Blacks were beaten at their own game and the Welsh dominated the scrum throughout. The only score of the game was a brilliantly worked try for Wales and the All Blacks suffered their only defeat of the tour. An equalising score by New Zealand was judged to have been short of the line and controversy continues to this day. The history books record however that it was Wales 3 New Zealand 0.

1906 Cartoon by NZ artist Trevor Lloyd celebrating the success of the All Blacks

That one loss was the only defeat in an otherwise incredible run of success. The All Blacks won their remaining four games on British soil, crossed the channel to crush France 38-0 and then crossed the Atlantic to tour America before heading home in triumph to a heroes' welcome. And they have never really looked back have they? No doubt we can look forward to some more of the same as the Rugby World Cup rolls into Blighty, albeit with less diverse tactics. Hopefully someone can give them a run for their money.

The Natives and the Originals - all the stats